
It is important to understand basic photography techniques before you can take beautiful portraits. A shallow depth of field is important, as it makes your subject stand out from the background. Aperture Priority mode automatically sets the shutter speed. To blur the background further, you could also use a specialist portrait lenses with a large aperture. Remember to consider the focal length of your lens in both cases.
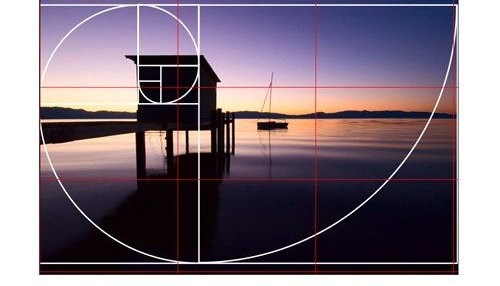
Compositional framing
For portrait photography, compositional framing can be used to make compelling photos. This is used to highlight the subject and create depth in a portrait. As a two-dimensional representation of a three-dimensional world, photographs should create a sense of depth to draw viewers into the scene. Photographs can have one focal point or several. The best way to draw attention and maintain harmony is compositional framing.
Head tilt
There are many methods to capture great portrait photographs. One option is to tilt the subject's head so that the eyes are at a new angle. Aim to position the camera at eye level or slightly higher. This will bring out more of your subject's features and give your photos a slimming effect. Additionally, the higher angle the subject is at, the more they will appear to be looking up. This enhances the overall effect. You may also want to experiment with the different tilting techniques on different subjects.
Wide-angle lens
A wide-angle lens is a great way to get more out of portraits. Wide-angle photography is a great way to highlight the subject while allowing the background to complement the story. It's essential to keep the subject in focus, as barred or distracted subjects may make it difficult for viewers to appreciate the main subject. Here are some helpful tips for wide-angle photography.
Rapid shutter speed
You can use fast shutter speed techniques to create dynamic portraits. These techniques are particularly helpful when the subject in the portrait is moving. For example, hair moving quickly needs a fast shutter speed in order to freeze it without visible motion blur. While a little bit of motion blur is nice, too much of it can be distracting. High ISO speeds are often required to use fast shutter speeds. This can cause portraits to look grainy or noisy, and your skin may look uneventer.

Avoiding distracting background
It is possible to blur distracting backgrounds in order to create a better portrait. This can be done by opening up your camera aperture or by moving closer to the subject. The background will appear less distracting by a wider aperture. The background can also be framed in a way that it fills the frame, which will make the subject appear to be the only part of the photo. This can be used to create stunning backgroundbokeh.
FAQ
Which Lenses should I Use?
The most popular question that beginners ask is "What lens do I need?" There are many options. It can be difficult to make a decision.
The good news is that you don't necessarily need to buy a new lens every time you purchase a new camera. Instead, you can add lenses later on.
Here are three types you might be interested in.
-
Wide Angle Lens (14mm-24mm): These lenses offer a wide field of view that allows you to capture more detail. You can zoom in and not lose image quality.
-
Normal/Standard Zoom Lens (28mm to 70mm) : These lenses allow you the flexibility of changing focal lengths, while still maintaining high quality images.
-
Telephoto Zoom Lens (70mm - 200mm): These lenses are great for capturing distant subjects. These lenses allow you to focus on your subject, even though they may appear small in the frame.
Combining lenses can create different effects. Combining lenses can create different effects. For example, a normal lens could be used to capture small details while a telephoto lens is used to capture faraway objects.
Photography is a talent?
Photography is not a talent but an art form that requires practice, training, and experience. To master any aspect of photography, it takes years of practice and study.
Photography is also a business where you need to have a plan for how you are going to make money from it.
This requires you to identify the type of client you are trying to attract and to find out how to reach them.
It is important to understand who your customers are and what their needs are. You must learn to communicate clearly and persuasively to persuade them to buy your services.
This means you need to be prepared and well-organized when meeting potential clients.
A portfolio of your work is essential in order to be able to approach potential clients. You can either create a portfolio digitally with software programs, or print it on paper.
After creating a portfolio you should look for opportunities to present it. You could approach businesses directly or post ads online.
Is digital photography hard?
Digital Photography is not as easy as you think. Learning how to properly use the tools takes effort and time. For different shots, you need to know which settings to use. It is best to practice what you have learned. Practice makes perfect.
How can my phone improve my photo skills?
You don't need expensive equipment to take great photos! Amazing images are possible with just a smartphone.
Just need to learn the basics of how to use it all.
Many apps are available for iOS and Android that allow you to easily edit and share photos.
Here are five tips to help get you started taking better photos.
-
Set Up Your Camera App. Your device should already have your camera app installed. If it is not installed, you can download it from Google Play.
-
Use Effects & Filters. Effects and filters allow you to alter the appearance of your photos without needing to touch them.
-
Adjust Exposure. You can adjust the exposure to control the brightness of your photo.
-
Shoot In The Right Light. Shooting in bright light makes it easier to see details in your subject. Photographing in low light conditions allows you to capture the highlights and shadows of your image.
-
Photograph People. Photographing people can show others what you are most passionate about.
To learn more about how to take better photos, check out our article: 5 Tips To Improve Your Photography Skills On A Smartphone.
Statistics
- This article received 13 testimonials, and 100% of readers who voted found it helpful, earning it our reader-approved status. (wikihow.com)
- Get 40% off Adobe Creative Cloud(opens in new tab) (creativebloq.com)
- While I cannot prove that all of those spots were not sensor dust, the photo was taken during a heavy snowstorm…so I guess that 99.8% of the spots are snowflakes. (bhphotovideo.com)
- The second easiest way to get blurry photos 100% of the time is to use a cheap filter on the front of your lens. (photographylife.com)
External Links
How To
How to take photos in low light conditions
Low-light photography refers to taking photos in dimly lit or dark environments. It requires special equipment. The main challenges are controlling exposure, white-balance, and sharpness. Two types of low-light photography exist: ambient or flash. Flash photography works well when there is sufficient light around you. A flash is required if there isn’t enough light. You might need a flash if your subject is outside but indoors. A flash is not necessary if you aren't interested in shooting at night with the moonlit hours. This will give you some beautiful shadows and colors. Another option is to shoot during twilight. Twilight occurs when the sun has set, but there is still daylight left.
Also, you might want to try long exposures. Long exposures enable you to take images even after your shutter has been open for several seconds. The shutter must be closed so that the camera only records light that hits the sensor. During a long exposure, this light continues to fall onto the photo sensor. Because the shutter was closed, no new light enters your lens. This means that you will not see any movement. To ensure clear images, disable any autofocus and exposure settings. You should also adjust the ISO setting prior to you start taking photos. An ISO setting of 200 will give you more control over the brightness or darkness of your image. Next, click quickly on the shutter button to capture the shot. The shutter will close completely. Next, hold the shutter button down until the end. The shutter button should be held down to prevent more light from entering the camera. Once you have taken your picture, wait for a few moments before you release that shutter button. This allows the camera's to process the image. While waiting, you can check out your photos on your computer screen. When you are happy with your photos, save them to the computer.